

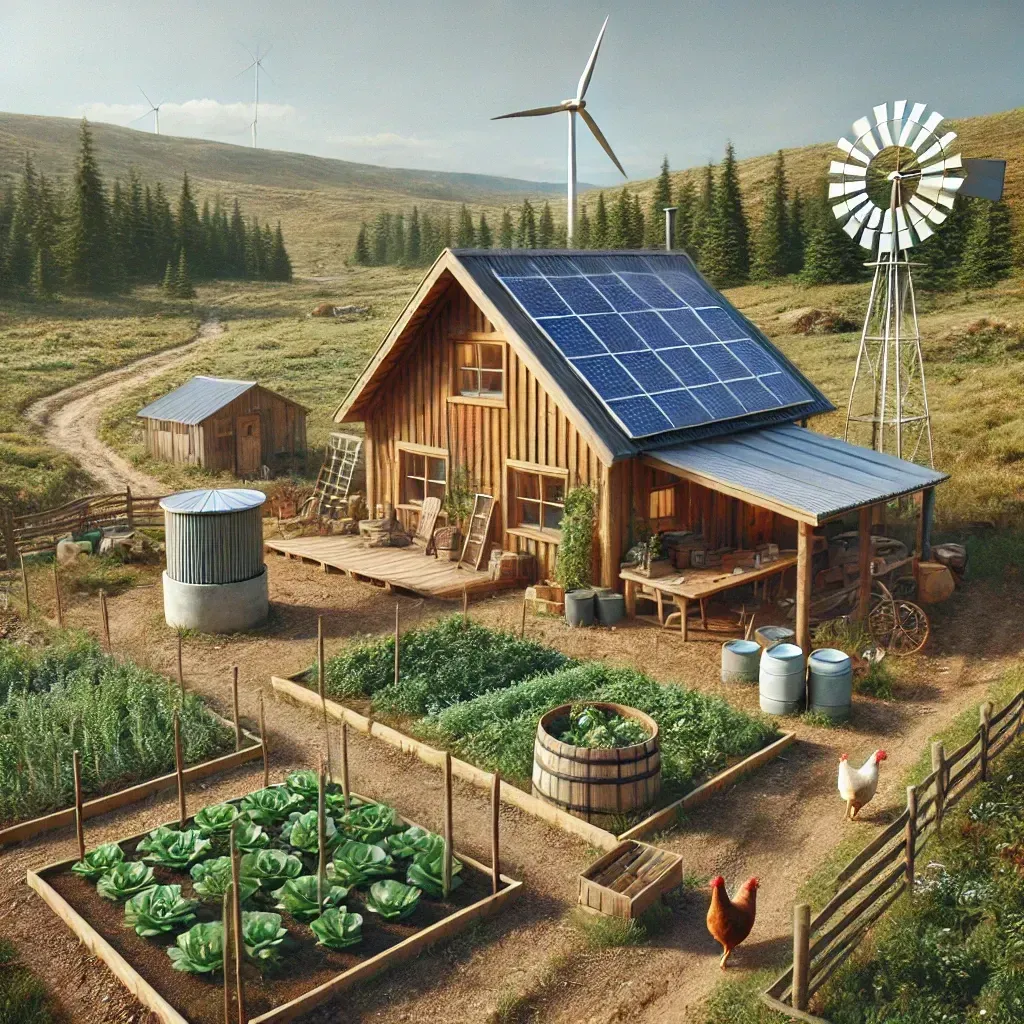
How to Build Your Dream Off-Grid Homestead: A Complete Guide for Rural Land Buyers

Finding the Perfect Land for Your Off-Grid Homestead

Building an off-grid homestead is more than just a trend—

It’s a lifestyle choice that promises independence, self-sufficiency, and a deep connection with nature. For rural land buyers seeking 1 to 15 acres of undeveloped land, creating a sustainable off-grid haven is the ultimate goal. This comprehensive guide is designed to walk you through the entire process, from searching for the perfect plot of land to setting up energy, water, and waste management systems. It provides expert advice, actionable tips, and legal considerations, with a special focus on rural land in Oklahoma.

Whether you’re a seasoned homesteader or just starting your journey, this guide will help you build your dream off-grid home, with resources and recommendations to simplify your land-buying process.

Table of Contents

1. Define Your Priorities

Before diving into the land search, it’s essential to clarify your homesteading goals. Think about the type of lifestyle you want to create. Are you looking for complete isolation, or do you want to be near a small town for convenience? Some other important questions to ask yourself include:
  • How much land do I need for my homestead and agricultural activities?
  • What natural resources (like water access) are crucial for my off-grid lifestyle?
  • What climate conditions do I prefer or need to consider?
  • Am I prepared for remote living with limited access to infrastructure?
For off-grid living, most buyers find that between 5 and 15 acres offer the ideal balance between privacy, agricultural space, and manageable land upkeep.

2. Consider a Few Key Factors When Buying Rural Land

  1. Water Sources: One of the most critical elements of an off-grid homestead is access to water. Look for land with natural water sources like creeks, rivers, or springs. In Oklahoma, groundwater is often accessible, and you may be able to dig a well, though the cost and feasibility will depend on the depth of the aquifer and local geology.Insight: Plan on spending as much as $20,000 for your water well system with the pump, line casings, storage tank, water filtration/treatment system, and cost of the actual drilling itself.
  2. Soil Quality: If you plan to grow your food, check the quality of the soil. Sandy soils are common in parts of Oklahoma and can drain quickly, while clay-rich soils retain moisture but may be more difficult to cultivate. Soil testing kits or local agricultural extension offices can help you assess soil health.
  3. Zoning and Land Use Regulations: Zoning laws vary by county, so check local regulations to ensure your land can be used for off-grid homesteading. In Oklahoma, agricultural zoning is often flexible, but residential building codes and septic system requirements could apply. Make sure to investigate local ordinances and water rights before purchasing land.Insight: More often than not, properties located outside city limits don’t carry the same requirements for aspects like a building permits. This could be a significant time-saver
  4. Topography and Terrain: Consider the slope of the land and its suitability for building. Hillside lots can offer stunning views but may require more intensive grading and drainage work. Flat lands are easier to develop but could be prone to flooding depending on the area.

Legal Considerations and Zoning Laws for Off-Grid Living in Oklahoma

3. Understanding Zoning Laws

Before purchasing any rural land in Oklahoma, familiarizing yourself with local zoning laws isn’t just advisable—it’s essential for protecting your investment and ensuring your homesteading vision is legally viable. Oklahoma’s 77 counties each maintain their own zoning ordinances, and the variation between them can be dramatic. What’s permitted in Pushmataha County might require special approval in Cleveland County, making due diligence a non-negotiable first step.

The Zoning Classification System

Oklahoma municipalities and counties typically organize land into several primary zoning classifications: residential, agricultural, commercial, industrial, and mixed-use. For off-grid homesteaders, agricultural zoning (often designated A-1 or AG) offers the most flexibility and fewest restrictions. Land zoned agricultural generally permits:

      • Construction of primary residences and accessory structures
      • Raising livestock including cattle, goats, chickens, and horses
      • Crop cultivation for personal use or commercial sale
      • Installation of wells, septic systems, and alternative energy infrastructure
      • Construction of barns, workshops, and storage buildings


However, even within agricultural zones, specific activities may require additional permits. For instance, operating a commercial farm stand, hosting agritourism events, or establishing a home-based food processing operation might necessitate a conditional use permit or zoning variance.


Unincorporated vs. Incorporated Areas

One of Oklahoma’s advantages for off-grid enthusiasts is the prevalence of unincorporated land—areas that fall outside city or town jurisdictions and are governed only by county regulations. Unincorporated areas typically feature:

      • Minimal or no building codes beyond state requirements
      • Greater flexibility for alternative construction methods
      • Fewer restrictions on land use activities
      • Lower property tax assessments in many cases


Counties like Pushmataha, McCurtain, Atoka, and Hughes contain vast unincorporated regions where regulatory oversight is lighter. However, “lighter” doesn’t mean “nonexistent.” Always verify current regulations with the county assessor’s office and planning department before assuming you can build or operate freely.


Tiny Homes, ADUs, and Alternative Dwellings

If your off-grid plans include a tiny home, yurt, converted shipping container, or other alternative dwelling, zoning becomes particularly critical. Oklahoma’s regulatory landscape for these structures varies considerably:

Tiny Homes on Wheels (THOWs): Most Oklahoma counties classify these as recreational vehicles rather than permanent residences. Living in a THOW full-time may violate zoning ordinances in some areas, while other counties have no restrictions whatsoever. Some homesteaders navigate this by establishing a traditional septic system and well, then designating the THOW as a “temporary” structure while building a code-compliant primary residence.

Tiny Homes on Foundations: When permanently affixed to land with a foundation, tiny homes are generally treated as standard residential structures. The primary obstacle becomes minimum square footage requirements, which some counties set at 600-1,000 square feet for primary residences. However, many rural Oklahoma counties have no minimum size requirements at all.

Accessory Dwelling Units (ADUs): If you’re planning multiple structures—perhaps a primary home plus a guest cabin or workshop with living quarters—investigate ADU regulations. Some counties limit the number, size, or placement of secondary dwellings on a single parcel.

Conducting Your Zoning Research

Before making an offer on any property, take these concrete steps:

      1. Contact the County Assessor’s Office: Request the property’s current zoning designation and any overlay districts that may apply (flood zones, watershed protection areas, etc.).
      2. Review the County’s Zoning Ordinance: Most Oklahoma counties publish their zoning codes online. Read the specific regulations for your property’s zone classification, paying attention to permitted uses, conditional uses, setback requirements, and building height limitations.
      3. Speak with the Planning Department: Ask specifically about your intended use. Describe your plans for the property—residential construction, livestock, alternative energy systems—and get written confirmation of what’s permitted.
      4. Consult a Land-Use Attorney: For complex situations or high-value purchases, a one-hour consultation with an attorney specializing in Oklahoma land use can prevent costly mistakes.
      5. Talk to Neighbors: Existing landowners in the area can provide invaluable practical insight into how regulations are actually enforced and what activities have been approved or denied.

Understanding zoning before you buy—not after—prevents the frustrating scenario of owning beautiful land you can’t legally use as intended.

4. Water Rights and Usage

Water is the lifeblood of any homestead, and in Oklahoma, understanding water rights before purchasing land can mean the difference between a thriving off-grid property and an expensive legal headache. Oklahoma operates under a dual water rights system—one framework for surface water and another for groundwater—each with distinct rules, permit requirements, and practical implications for rural landowners.

Surface Water: State Ownership and Permit Requirements

Under Oklahoma law, all surface water—rivers, streams, lakes, and ponds fed by natural watercourses—belongs to the state and is held in public trust. This means that even if a creek runs directly through your property, you don’t automatically have the right to divert or impound that water for irrigation, livestock, or household use beyond minimal amounts.
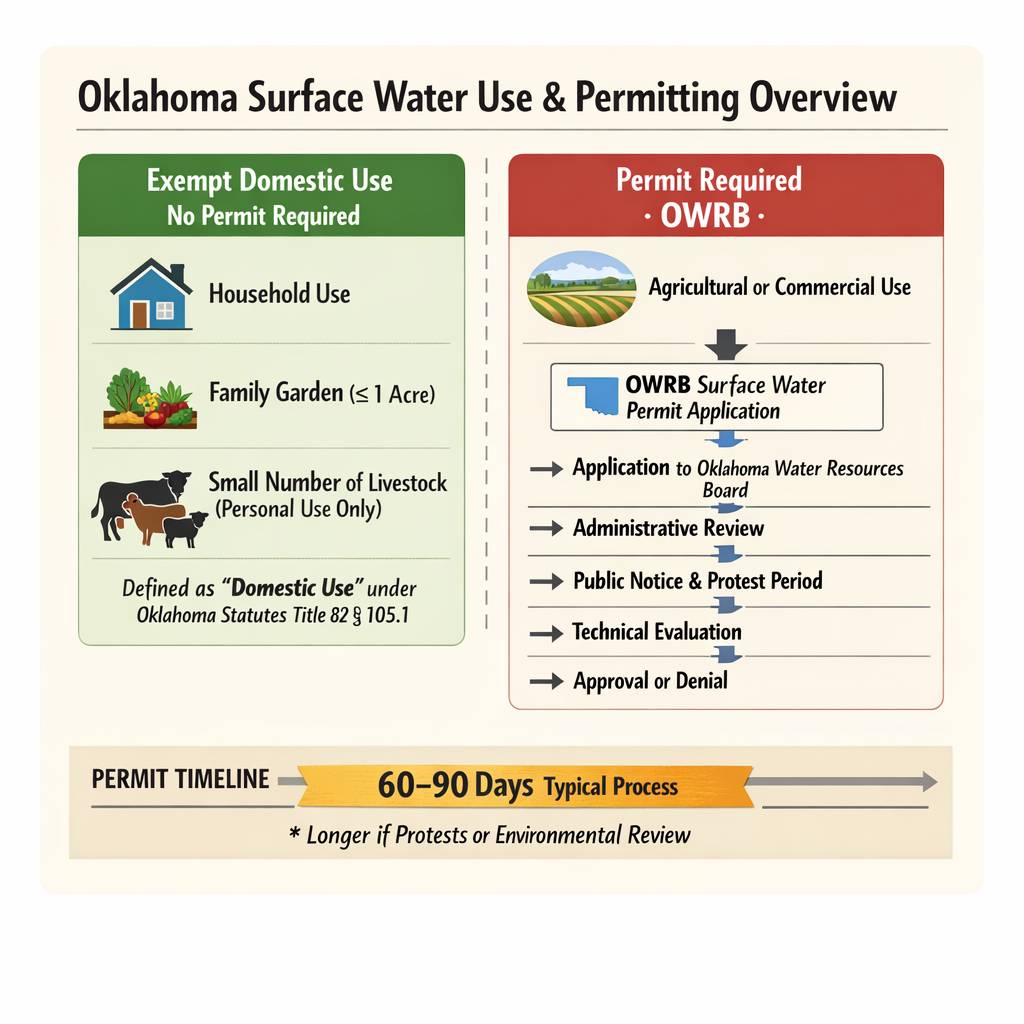
Diagram showing the surface water permit application process with OWRB, including timeline expectations (typically 60-90 days for standard applications)

The Oklahoma Water Resources Board (OWRB) administers surface water rights through a prior appropriation system, commonly summarized as “first in time, first in right.” To legally use surface water for anything beyond basic domestic purposes, you must:

    1. Apply for a water use permit through the OWRB
    2. Demonstrate a beneficial use for the water (agriculture, irrigation, livestock, etc.)
    3. Not interfere with senior water rights holders who obtained permits before you

Domestic use exemption: Oklahoma law does allow limited surface water use for “domestic purposes” without a permit. This includes water for household consumption, watering a family garden (up to one acre), and maintaining a small number of livestock for personal use—not commercial operations. However, the threshold is low, and any significant agricultural operation will likely require permitting.

Citation: Oklahoma Statutes Title 82, Section 105.1 defines domestic use and outlines permit exemptions. The full text is available through the Oklahoma Water Resources Board.


Groundwater: More Accessible, But Not Unlimited

Groundwater rights in Oklahoma are governed by a reasonable use doctrine modified by the OWRB’s basin-specific allocations. Unlike surface water, landowners generally have greater access to groundwater beneath their property—but “greater access” still comes with regulatory requirements.

Key groundwater considerations for homesteaders:

Well Drilling Permits: Oklahoma requires permits for most water wells, administered through the OWRB. The permit process involves:

    • Filing an application with well location and intended use
    • Paying applicable fees (typically $50-150 for domestic wells)
    • Using a licensed well driller registered with the state
    • Submitting completion reports after drilling

Maximum Annual Yield (MAY): The OWRB establishes MAY allocations for each groundwater basin, determining how much water can be legally withdrawn per acre of land ownership. In some basins, this allocation is generous (2+ acre-feet per acre annually); in others, it’s more restrictive. Before purchasing land, verify the MAY allocation for the underlying aquifer.

Domestic Use Exemption: Similar to surface water, Oklahoma exempts domestic groundwater use from permit requirements—but the exemption has limits. Domestic use is defined as household purposes, irrigation of land not exceeding three acres, and watering livestock up to the normal carrying capacity of the land. Exceeding these thresholds triggers permit requirements.


Practical Due Diligence for Water Access

Before committing to any rural Oklahoma property, conduct thorough water due diligence:

Due Diligence ItemResourceWhy It Matters
Aquifer identificationOWRB Interactive MapsDetermines drilling depth, cost, and yield expectations
Existing well recordsOWRB Well Log DatabaseReveals what previous owners found—or didn’t find
MAY allocationOWRB Basin ReportsSets legal limits on water withdrawal
Neighboring well dataCounty records, neighbor interviewsIndicates aquifer reliability in your specific area
Surface water rightsOWRB permit recordsIdentifies existing claims on any streams or ponds


Map of Oklahoma's major aquifers (Ogallala, Arbuckle-Simpson, Roubidoux, Antlers) with average well depths and yield expectations by region.

Pro tip: Request a hydrogeological assessment for properties where water access is critical to your plans. These assessments—typically $500-2,000—evaluate groundwater availability, estimate drilling depths, and identify potential contamination risks. The upfront cost is minimal compared to discovering inadequate water supply after closing.

Water Rights and Property Transfers

When purchasing land with existing water rights or wells, verify that those rights transfer with the property. Water permits are typically appurtenant to the land (meaning they transfer automatically), but confirm this with the OWRB and ensure proper documentation at closing. Existing wells should include:

    • Original drilling permits and completion reports
    • Water quality test results
    • Pump specifications and maintenance records
    • Any OWRB correspondence regarding the permit

Understanding Oklahoma’s water rights framework protects your investment and ensures your homestead has the legal foundation for sustainable water access.


6. Setting Up Sustainable Energy Solutions

Energy independence is the cornerstone of successful off-grid living, and Oklahoma’s geography offers distinct advantages for self-sufficient power generation. With an average of 235 sunny days annually and some of the most consistent wind resources in North America, the state provides ideal conditions for renewable energy systems. However, designing a reliable off-grid power system requires careful planning, realistic expectations, and an understanding of how Oklahoma’s climate patterns affect energy production throughout the year.

Solar Power: The Foundation of Off-Grid Energy

Infographic showing common appliance wattages and daily consumption estimates for a typical off-grid Oklahoma homestead

Solar photovoltaic (PV) systems have become the default energy solution for off-grid homesteads—and for good reason. Equipment costs have dropped over 70% in the past decade, technology reliability has improved dramatically, and Oklahoma’s solar resource ranks among the top 15 states nationally. But transitioning from grid power to solar independence requires more than purchasing panels; it demands a systematic approach to system design.

Step 1: Conduct a Comprehensive Energy Audit

Before sizing your solar system, document your actual energy consumption. Most off-grid newcomers significantly underestimate their power needs, leading to undersized systems and frustrating power shortages. Create a detailed inventory:

ApplianceWattsHours/DayDaily Wh
Refrigerator (efficient model)1508 (cycling)1,200
LED Lighting (10 bulbs)1005500
Laptop506300
Well Pump1,00011,000
Washing Machine5000.5250
Misc. (phone charging, router, etc.)100242,400
Daily Total  5,650 Wh

Add a 25% buffer for system inefficiencies, inverter losses, and unexpected loads. In this example, you’d design for approximately 7,000 Wh (7 kWh) daily production capacity.

Step 2: Size Your Solar Array for Oklahoma Conditions

Oklahoma averages 4.5-5.5 peak sun hours daily, varying by season and location. Use the lower figure (4.5) for conservative system sizing to ensure adequate power during winter months and cloudy periods.

Calculation formula: Daily energy need ÷ Peak sun hours ÷ System efficiency (0.80) = Required array wattage

Using our example: 7,000 Wh ÷ 4.5 hours ÷ 0.80 = 1,944 watts minimum

Rounding up for practical panel configurations, a 2,000-2,500 watt (2-2.5 kW) array would serve this household. At current pricing, expect to pay $0.70-1.00 per watt for quality panels, plus mounting hardware, wiring, and installation labor if not DIY.

Citation: Solar resource data derived from the National Renewable Energy Laboratory (NREL) PVWatts Calculator, available at pvwatts.nrel.gov. Oklahoma-specific solar irradiance maps available through NREL’s Solar Resource Data.

Step 3: Battery Storage—The Critical Component

Your battery bank determines how long you can operate without sunlight. For off-grid systems, plan for 2-3 days of autonomy—the ability to power your homestead through consecutive cloudy days without solar input.

Battery technology comparison:

Battery TypeCycle LifeDepth of DischargeCost per kWhBest For
Lead-Acid (FLA)500-1,00050%$150-200Budget systems, DIY maintenance
AGM500-80050%$250-350Low maintenance, moderate budgets
Lithium Iron Phosphate (LiFePO4)3,000-5,00080-90%$400-600Long-term value, limited space

For our 7 kWh daily example with 3-day autonomy at 50% depth of discharge (lead-acid): 7 kWh × 3 days ÷ 0.50 DoD = 42 kWh battery bank

Lithium batteries, while more expensive upfront, often prove more economical over a 10-15 year system lifespan due to superior cycle life and deeper discharge capability.

Side-by-side comparison photos of lead-acid battery bank vs. lithium battery bank for equivalent storage capacity, showing space requirements

Step 4: Inverter and Charge Controller Selection

Inverters convert DC battery power to AC household current. For off-grid systems, choose a pure sine wave inverter rated for your peak load requirements plus 25% headroom. If your largest simultaneous load is 3,000 watts, select a 4,000-watt inverter minimum. Quality brands (Victron, Outback, Schneider) cost more but offer better surge handling, longer warranties, and superior reliability.

Charge controllers regulate power flow from panels to batteries. MPPT (Maximum Power Point Tracking) controllers are the modern standard, offering 15-30% greater efficiency than older PWM technology. Size your controller for your array’s maximum voltage and amperage output.

Step 5: System Configuration and Installation

Ground-mount vs. roof-mount: Ground-mounted arrays offer easier maintenance, optimal angle adjustment, and simpler expansion. Roof mounts save land space but complicate repairs and may void roofing warranties. For homesteads with acreage, ground mounting typically makes more sense.

Panel orientation: In Oklahoma (roughly 34-37° latitude), optimal fixed-array tilt is 30-35° facing true south. Adjustable mounts that allow seasonal tilt changes can improve annual production by 10-15%.

Pro tip: Install your array with expansion capacity from the start. Running appropriately sized conduit and wire for a future-doubled system costs marginally more during initial installation but saves significant expense if you add capacity later.

Wind Power: Oklahoma’s Underutilized Advantage

Oklahoma ranks third nationally in wind energy potential, yet most off-grid homesteaders overlook small-scale wind generation. While solar should remain your primary source, wind turbines can provide valuable supplemental power—particularly during winter months when solar production drops and wind speeds increase.
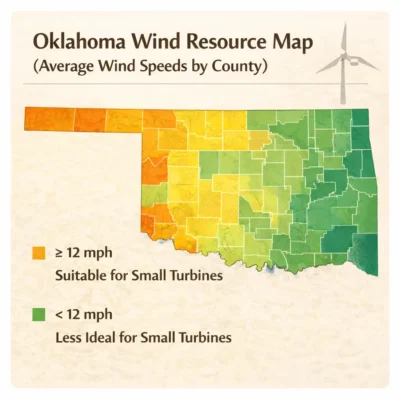
Map of Oklahoma by county showing wind resource zones and small wind turbine suitability, with southeastern counties highlighted.Small wind viability assessment:

Wind power follows the cube law—doubling wind speed increases energy output eightfold. This makes average wind speed the critical factor in turbine economics. The U.S. Department of Energy recommends minimum average wind speeds of 9 mph (4 m/s) for small turbine viability, with 12+ mph being ideal.

Oklahoma’s wind resources vary significantly by region:

  • Western Oklahoma (Panhandle, Roger Mills, Custer counties): Excellent wind resources, 12-16 mph average
  • Central Oklahoma: Moderate resources, 10-12 mph average
  • Eastern Oklahoma (Ozark foothills): Generally poor for wind, 7-9 mph average with turbulent flow


Small turbine considerations:

FactorRecommendation
Tower heightMinimum 80 feet; 100+ feet optimal for consistent wind
Turbine size1-10 kW for residential off-grid supplementation
ZoningVerify height restrictions and setback requirements with county
NoiseModern small turbines produce 35-45 dB at rated speed; site away from sleeping areas
MaintenanceBudget for annual inspections and 5-year major service intervals

Citation: Wind resource data from the Oklahoma Wind Power Initiative and AWS Truepower wind maps. Small wind guidelines from the American Wind Energy Association’s Small Wind Guidebook.

Backup Power: Generators and Redundancy Planning

Even well-designed renewable systems experience production gaps. Extended cloudy periods, equipment failures, or unusual demand spikes can deplete batteries faster than solar or wind can replenish them. A backup generator isn’t an admission of failure—it’s prudent engineering.

Generator sizing and selection:

Your generator should handle your essential loads while recharging batteries. For most off-grid homesteads, a 5,000-8,000 watt generator provides adequate capacity. Key selection criteria:

Fuel type considerations:

FuelAdvantagesDisadvantages
PropaneLong storage life, clean burning, easy bulk deliveryHigher equipment cost, slightly lower efficiency
GasolineWidely available, lower equipment costShort storage life (6-12 months), more maintenance
DieselExcellent efficiency, long engine lifeGelling in cold weather, fuel storage regulations
Dual-fuel (propane/gas)Flexibility, redundant fuel optionsMore complex, higher initial cost

For off-grid applications, propane often makes the most sense. It stores indefinitely, burns cleaner (extending engine life), and most rural Oklahoma properties can accommodate a large propane tank for whole-property fuel supply.

Inverter generators vs. conventional:

Modern inverter generators produce cleaner power suitable for sensitive electronics and operate more quietly than conventional units. The premium cost (typically 30-50% more) is worthwhile for off-grid primary backup applications. Brands like Honda, Yamaha, and Champion offer reliable units with strong dealer networks in Oklahoma.

Generator integration:

Wire your generator to work seamlessly with your solar system through your inverter/charger. Quality off-grid inverters (Victron, Outback, Magnum) include automatic generator start functionality—triggering the generator when battery voltage drops below a set threshold and stopping it when batteries reach full charge. This automation prevents deep discharge damage and eliminates manual monitoring.

Runtime and fuel planning:

Calculate fuel consumption based on expected runtime hours. A typical 6,000-watt propane generator consumes 1.5-2 gallons per hour at 50% load. If you anticipate 100 hours of annual generator use, budget 150-200 gallons of propane for backup power alone, plus reserves for heating or cooking if applicable.
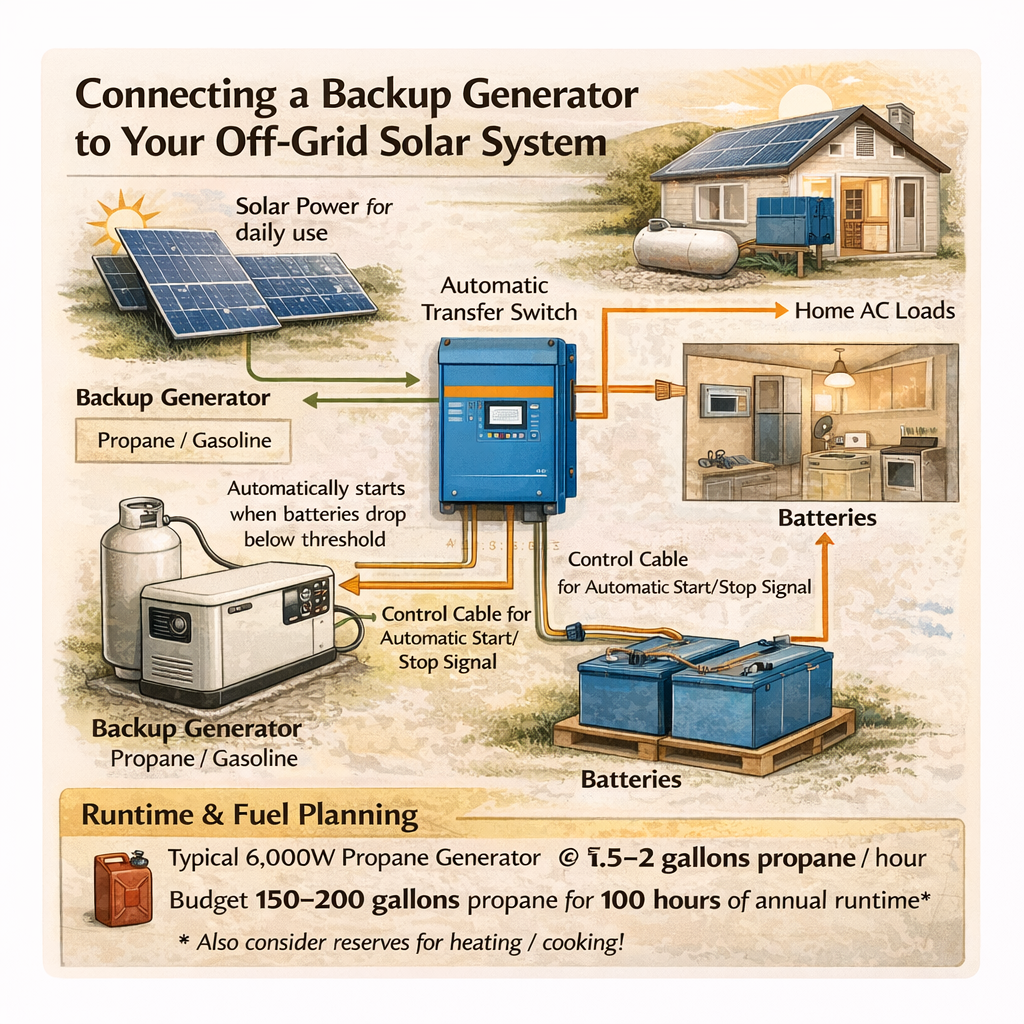
Wiring diagram showing generator integration with off-grid solar system, including automatic transfer switch and battery charging configuration

Hybrid System Design: Putting It All Together

The most resilient off-grid energy systems combine multiple generation sources with appropriate storage and intelligent management. A well-designed hybrid system might include:

  • Primary: 3-4 kW solar array providing 70-80% of annual energy
  • Secondary: 1-2 kW wind turbine supplementing winter production
  • Backup: 6,500-watt propane generator for extended emergencies
  • Storage: 20-30 kWh lithium battery bank (2-3 days autonomy)
  • Management: Inverter/charger with automatic source switching and generator integration

System monitoring:

Invest in monitoring equipment that tracks production, consumption, and battery state of charge. Products like Victron’s VRM portal or Outback’s MATE3s provide real-time data and historical tracking, helping you identify inefficiencies and optimize usage patterns. Understanding your system’s actual performance—not theoretical performance—allows continuous improvement.

Pro tip: Document your system configuration thoroughly. Create a binder with equipment manuals, wiring diagrams, warranty information, and maintenance schedules. This documentation proves invaluable for troubleshooting and essential if you ever sell the property.


7. Water Solutions for Your Off-Grid Homestead

Reliable water access ranks alongside energy as the most critical infrastructure decision for off-grid homesteaders. Unlike municipal systems where water flows predictably from a tap, self-sufficient water systems require careful planning, redundancy, and ongoing maintenance. Oklahoma’s diverse hydrogeology—from the shallow sand aquifers of the eastern woodlands to the deep limestone formations of the Arbuckle region—means water solutions vary dramatically by location. Understanding your options and matching them to your property’s specific conditions determines whether your homestead thrives or struggles.

Drilling a Well: Tapping Oklahoma’s Groundwater

For most off-grid properties, a drilled well provides the most reliable year-round water source. Unlike rainwater harvesting, wells deliver consistent supply regardless of precipitation patterns—a significant advantage during Oklahoma’s periodic droughts. However, well drilling represents a substantial investment, and outcomes vary based on geology, depth, and aquifer characteristics.

Understanding Oklahoma’s Aquifer Systems

Oklahoma contains over 20 major aquifers, each with distinct characteristics affecting well depth, yield, and water quality:

AquiferRegionTypical DepthExpected YieldWater Quality
OgallalaPanhandle, NW Oklahoma100-400 ft50-500+ gpmGenerally excellent
Arbuckle-SimpsonSouth-central200-800 ft10-100 gpmGood, sometimes hard
AntlersSoutheast100-600 ft5-50 gpmVariable, may need treatment
RoubidouxNortheast300-1,200 ft5-30 gpmOften high mineral content
Alluvial (River)Along major rivers20-80 ft10-100 gpmVariable, contamination risk
Terrace DepositsCentral30-150 ft5-50 gpmGenerally good

[Image suggestion: Cross-sectional geological diagram showing Oklahoma’s major aquifer formations, typical well depths, and regional distribution]

Pre-Drilling Due Diligence

Before committing thousands of dollars to well drilling, conduct thorough research:

1. Review existing well logs: The Oklahoma Water Resources Board maintains a database of completed well logs searchable by location. These records reveal what previous drillers encountered—depth to water, geological formations, and yield rates. Access the database at owrb.ok.gov/maps.

2. Consult neighboring landowners: Nothing beats local knowledge. Neighbors can tell you their well depths, water quality issues, and which drilling companies performed reliably. This intelligence often proves more valuable than official records.

3. Commission a hydrogeological assessment: For properties where water is uncertain or the investment is significant, a professional hydrogeological study ($500-2,500) evaluates aquifer conditions, estimates drilling depth, and identifies potential issues before you commit. Consider this essential insurance on properties exceeding $50,000 in value.

4. Verify water rights: As discussed in Section 4, confirm that adequate groundwater allocation exists for your intended use. Properties overlying stressed aquifers may have restricted Maximum Annual Yield allocations.

Citation: Well log data and aquifer information available through the Oklahoma Water Resources Board’s Interactive Maps and Well Log Database at owrb.ok.gov.

The Well Drilling Process

Drilling a residential water well in Oklahoma typically follows this sequence:

Step 1: Permit acquisition File a well permit application with the OWRB. For domestic wells (household use, up to 3 acres irrigation, normal livestock watering), the process is straightforward—typically $50-100 in fees with approval within 2-4 weeks. Commercial or agricultural wells require additional documentation.

Step 2: Driller selection Oklahoma requires well drillers to hold state licenses. Verify credentials through the OWRB’s licensed driller database. Obtain at least three quotes, and evaluate drillers on:

  • Experience in your specific area and aquifer type
  • Equipment appropriate for expected depth and geology
  • References from recent local projects
  • Clear pricing structure (per-foot vs. fixed bid, what’s included)
  • Warranty terms on materials and workmanship

Step 3: Drilling and completion Actual drilling typically takes 1-5 days depending on depth and geology. The driller will:

  • Set up equipment and drill to the water-bearing formation
  • Install steel or PVC casing to prevent collapse and contamination
  • Develop the well (remove drilling mud, establish water flow)
  • Install a well cap and prepare for pump installation

Step 4: Pump installation Well drilling and pump installation are often separate contracts. Pump selection depends on:

FactorConsideration
Well depthShallow wells (<25 ft) can use jet pumps; deeper wells require submersible pumps
Yield ratePump capacity shouldn’t exceed sustainable well yield
Vertical liftTotal height from water level to highest delivery point
Daily demandSize pump and pressure tank for peak usage periods
Power sourceOff-grid systems typically use DC or 240V AC pumps; solar-direct options available

Step 5: Water quality testing Before consuming well water, conduct comprehensive testing for:

  • Bacteria (coliform, E. coli)
  • Nitrates/nitrites
  • pH and hardness
  • Iron and manganese
  • Total dissolved solids (TDS)
  • Arsenic (particularly in certain Oklahoma formations)

The Oklahoma Department of Environmental Quality provides testing guidance, and certified laboratories throughout the state offer testing packages ranging from $50 (basic bacteria) to $300+ (comprehensive panels).

[Image suggestion: Diagram showing well components—casing, screen, grout seal, pitless adapter, submersible pump, pressure tank, and wellhead protection area]

Well Drilling Costs in Oklahoma

Budget realistically for complete well installation:

ComponentCost RangeNotes
Drilling (per foot)$15-50/ftVaries by geology; harder rock costs more
Casing materials$500-2,500Steel vs. PVC, diameter, depth
Pump and controls$800-3,000Submersible pump, pressure switch, wiring
Pressure tank$200-800Size based on demand; larger reduces pump cycling
Electrical/plumbing$500-2,000Trenching, conduit, connection to home
Permit and testing$150-400OWRB permit plus water quality testing
Total (typical 200 ft well)$5,000-15,000Wide variance based on conditions

Pro tip: Some drillers offer “dry hole” guarantees or reduced rates if water isn’t found at expected depths. Clarify these terms before signing contracts. In challenging areas, negotiate a maximum depth or cost cap to limit risk.

Off-Grid Well Pump Considerations

Standard submersible well pumps require 240V AC power—problematic for off-grid systems with limited inverter capacity. Consider these alternatives:

DC solar pumps: Purpose-built for off-grid applications, DC pumps run directly from solar panels or batteries. Brands like Grundfos SQFlex and Sun Pumps offer models suitable for depths to 800+ feet. Higher upfront cost ($2,000-5,000) but eliminated inverter load and excellent efficiency.

AC pumps with soft starters: If using a standard AC pump, install a soft starter to reduce startup surge from 3-5x running watts to 1.5-2x. This allows smaller inverter sizing and reduces battery stress.

Gravity-fed storage: Pump water to an elevated storage tank during peak solar production, then gravity-feed to the home. This decouples pumping from demand, allowing optimal pump scheduling and providing pressure without electricity during outages.

7b. Rainwater Harvesting: Capturing Oklahoma’s Precipitation

Rainwater harvesting offers an excellent supplemental—or in some cases primary—water source for off-grid homesteads. Oklahoma’s average annual rainfall ranges from 17 inches in the Panhandle to 56 inches in the southeastern corner, making rainwater viability highly location-dependent. However, even moderate rainfall areas can capture substantial water with properly designed systems.

Calculating Harvest Potential

The fundamental formula for rainwater collection:

Collection (gallons) = Roof area (sq ft) × Rainfall (inches) × 0.623 × Efficiency factor

The efficiency factor (typically 0.75-0.85) accounts for evaporation, splash-out, and first-flush diversion. For a 1,500 square foot roof in an area receiving 40 inches annual rainfall:

1,500 × 40 × 0.623 × 0.80 = 29,904 gallons annually

That’s roughly 82 gallons daily—enough for a water-conscious household’s non-potable needs and a meaningful contribution toward total water independence.

[Image suggestion: Rainfall map of Oklahoma showing annual precipitation by region, with overlaid calculations showing harvest potential for a standard 1,500 sq ft roof in each zone]

System Components

A complete rainwater harvesting system includes:

1. Collection surface (roof) Metal roofs are ideal—they’re smooth, non-porous, and don’t leach contaminants. Avoid:

  • Asphalt shingles (petroleum compounds leach into water)
  • Treated wood shakes (chemical preservatives)
  • Lead-based or zinc-coated materials
  • Roofs with heavy tree overhang (debris and bird droppings)

If building new, specify a standing-seam metal roof in galvanized steel, aluminum, or painted steel for optimal rainwater collection.

2. Gutters and conveyance Seamless aluminum gutters sized appropriately for your roof area and regional rainfall intensity. Standard 5-inch K-style gutters handle most residential applications; high-rainfall areas or large roofs may need 6-inch gutters. Install leaf guards or screens to reduce debris entering the system.

3. First-flush diverter The first water off your roof after dry periods carries the highest contamination—dust, pollen, bird droppings, and debris. First-flush diverters capture and discard this initial runoff (typically 1-2 gallons per 100 square feet of roof), sending only cleaner water to storage.

Diverter TypeHow It WorksBest For
StandpipeSimple vertical pipe fills first, then overflows to tankDIY simplicity, low cost
Ball valveFloating ball seals inlet after chamber fillsReliable automatic operation
Volume-basedDiverts set volume, then switches to collectionPrecise control, higher cost

[Image suggestion: Detailed diagram of first-flush diverter installation showing roof connection, diverter chamber, cleanout valve, and overflow to storage tank]

4. Storage tanks Tank selection balances capacity, cost, material, and placement:

Tank TypeCapacity RangeCostProsCons
Polyethylene (plastic)50-10,000 gal$0.50-1.50/galLightweight, affordable, variety of sizesUV degradation if exposed, shorter lifespan
Fiberglass100-50,000 gal$1.00-2.00/galDurable, UV resistantHigher cost, limited shapes
Concrete (poured)500-100,000+ gal$0.75-1.50/galExtremely durable, temperature stablePermanent, requires curing, potential pH issues
Metal (galvanized/steel)100-25,000 gal$0.75-2.00/galDurable, aesthetic optionsPotential corrosion, conducts heat
IBC totes (repurposed)275-330 gal$50-150 eachVery affordable, readily availableLimited size, not ideal as sole storage

For most Oklahoma homesteads, polyethylene tanks in the 2,500-5,000 gallon range offer the best value. Place tanks on stable, level foundations (compacted gravel or concrete pads), shaded from direct sun if possible, and positioned for gravity feed to usage points where practical.

5. Filtration and treatment Rainwater treatment requirements depend on intended use:

Use CategoryMinimum TreatmentRecommended Treatment
Irrigation onlyDebris screenFirst-flush diverter, basic sediment filter
Livestock wateringSediment filterFirst-flush, sediment, UV or chlorination
Non-potable householdSediment + carbonFirst-flush, multi-stage filtration, UV
Potable (drinking)Full treatment trainSediment, carbon, UV, and/or RO system

Potable rainwater treatment typically includes:

  • 5-micron sediment pre-filter
  • Activated carbon filter (taste, odor, chemical removal)
  • 1-micron or sub-micron final filter
  • UV sterilization (99.9% pathogen kill)
  • Optional: reverse osmosis for additional purification

Citation: Rainwater harvesting system design guidelines from the American Rainwater Catchment Systems Association (ARCSA) and Texas Water Development Board’s Rainwater Harvesting Manual—applicable principles for Oklahoma conditions.

Legal Considerations in Oklahoma

Unlike some western states that restrict rainwater harvesting, Oklahoma places no limitations on residential rainwater collection. You may legally capture and use all precipitation falling on your property. However, if your system discharges overflow into waterways or if you sell harvested water commercially, additional regulations may apply. For standard residential homestead use, collect freely.

7c. Greywater Systems: Recycling Household Water

Greywater—wastewater from sinks, showers, bathtubs, and washing machines—represents a significant resource that most homes simply discard. A typical household generates 25-40 gallons of greywater daily per person, water that’s perfectly suitable for landscape irrigation with minimal treatment. For off-grid homesteads where every gallon carries cost (pumping energy, storage capacity, or supply limitations), greywater recycling makes compelling sense.

What Qualifies as Greywater

Understanding the distinction is critical:

Greywater (recyclable)Blackwater (requires septic/treatment)
Bathroom sinksToilet waste
Showers and bathtubsKitchen sink (food waste, grease)
Washing machineDishwasher
Utility sinks (non-chemical use)Any water containing fecal matter

Note: Kitchen sink water is classified as blackwater in most jurisdictions due to food particle content and grease, which create treatment complications. Some systems accept kitchen greywater with additional filtration, but the conservative approach routes it to septic.

Oklahoma Greywater Regulations

Oklahoma permits greywater recycling for subsurface irrigation under DEQ guidelines, provided systems meet specific criteria:

  • Greywater must be dispersed below ground surface (no surface ponding or spraying)
  • Systems must include filtration to remove hair, lint, and particles
  • Greywater cannot contact edible portions of food crops (root vegetables, leafy greens contacting soil)
  • Setbacks required from wells, property lines, and waterways (typically 50-100 feet from wells)
  • System must include overflow connection to septic for excess volume

No permit is required for residential greywater systems meeting these criteria in most Oklahoma counties, but verify with your county health department before installation.

Citation: Oklahoma greywater guidelines outlined in Oklahoma Administrative Code Title 252, Chapter 641 (On-Site Sewage Treatment). Contact Oklahoma DEQ Water Quality Division for current regulations.

Greywater System Types

1. Laundry-to-landscape (simplest) The most accessible greywater system routes washing machine discharge directly to landscape plants through mulch basins. No permit typically required; minimal components:

  • Washing machine drain hose
  • 3-way diverter valve (switch between greywater use and septic)
  • 1-inch polyethylene distribution tubing
  • Mulch-filled basins around trees or shrubs

Cost: $100-300 DIY Capacity: 15-40 gallons per load Best for: Fruit trees, established shrubs, non-edible landscaping

[Image suggestion: Simple diagram showing laundry-to-landscape system with diverter valve, distribution line, and mulch basin detail]

2. Branched drain systems Gravity-fed networks distribute greywater from multiple sources to various landscape zones. Requires careful grade planning (minimum 2% slope throughout) and proper pipe sizing.

Components:

  • Collection plumbing from fixtures
  • Surge tank (handles peak flows, allows settling)
  • Distribution manifold
  • Branched 1-2″ distribution lines
  • Mulch basins or subsurface emitters

Cost: $500-2,000 depending on complexity Capacity: 50-150 gallons daily Best for: Comprehensive household greywater recycling

3. Pumped systems with treatment For sites with unfavorable grades or where higher water quality is needed, pumped systems add flexibility. Components include:

  • Collection/surge tank
  • Filtration (sand filter, constructed wetland, or commercial filter)
  • Pump to pressurized distribution
  • Subsurface drip irrigation

Cost: $2,000-5,000+ Capacity: 100-300+ gallons daily Best for: Large households, challenging topography, higher-value irrigation applications

Greywater Best Practices

Use greywater-compatible products:

  • Choose biodegradable, plant-friendly soaps and detergents
  • Avoid products containing boron, sodium, or chlorine bleach
  • Minimize salt-based water softener discharge to greywater

Design for soil and plants:

  • Distribute greywater across adequate area (2-5 square feet per gallon daily)
  • Rotate application zones to prevent soil saturation
  • Select salt-tolerant plants for greywater irrigation
  • Mulch basins heavily (4-6 inches) to prevent surface exposure

Maintain your system:

  • Clean filters monthly during heavy use
  • Inspect distribution points for clogging
  • Switch to septic during illness (pathogens in bath/shower water)
  • Winterize exposed components in cold-weather months

Integration with overall water strategy:

Greywater recycling works best as part of a comprehensive water plan:

SourceBest UseDaily Yield (2-person household)
Well waterPotable, cooking, bathingAs needed (primary source)
RainwaterNon-potable household, irrigation, livestockVariable (0-200+ gal depending on weather)
GreywaterLandscape irrigation, orchard, non-food gardens50-80 gallons

By cascading water through multiple uses—potable → greywater → landscape—you maximize the value of every gallon pumped or collected, reducing overall demand on primary sources and building resilience against supply disruptions.


8. Waste Management Systems for Off-Grid Living

Waste management represents one of the least glamorous yet most critical infrastructure decisions for off-grid homesteaders. Unlike grid-connected homes where waste disappears into municipal systems, self-sufficient properties must process all biological waste on-site—safely, legally, and sustainably. Oklahoma offers several approved approaches, from traditional septic systems to composting toilets, each with distinct advantages depending on your site conditions, water availability, budget, and long-term homesteading philosophy.

8a. Composting Toilets: Waterless Waste Processing

Composting toilets have evolved from primitive outhouses into sophisticated systems that efficiently convert human waste into stable, odor-free compost through controlled aerobic decomposition. For off-grid homesteaders—particularly those with limited water supply or challenging soil conditions—composting toilets offer compelling advantages over conventional flush systems.

How Composting Toilets Work

All composting toilet systems rely on the same biological principles: aerobic bacteria break down human waste in the presence of oxygen, carbon-rich bulking material, and controlled moisture levels. The process destroys pathogens, reduces volume by 80-90%, and produces humus suitable for non-edible landscaping applications.

Key process requirements:
FactorOptimal RangeWhy It Matters
Carbon-to-nitrogen ratio25:1 to 35:1Balances decomposition speed and odor control
Moisture content40-60%Too dry stalls decomposition; too wet creates anaerobic (smelly) conditions
Oxygen availabilityContinuous airflowAerobic bacteria require oxygen; anaerobic conditions produce odors
Temperature60-100°FWarmer temperatures accelerate decomposition; freezing halts it

Carbon material—typically peat moss, coconut coir, sawdust, or wood shavings—is added after each use to maintain proper C:N ratio and absorb excess moisture. Ventilation systems (passive or fan-assisted) provide oxygen and remove moisture and any residual odors.

[Image suggestion: Cross-sectional diagram of a self-contained composting toilet showing ventilation system, composting chamber, finishing drawer, and airflow patterns]

Composting Toilet Types

1. Self-contained units Complete systems where the composting chamber sits directly beneath the seat. Best for cabins, small homes, or single-bathroom applications.

Model ExamplesCapacityPower RequiredPrice RangeBest For
Nature’s Head2 adults, full-time12V fan (minimal)$960-1,100Small households, RV/cabin use
Sun-Mar Excel3 adults, full-time120V fan + heater$2,000-2,400Year-round primary residence
Separett Villa4+ adults, full-time12V or 120V fan$1,000-1,200Urine-diverting, high capacity
Air Head2 adults, full-time12V fan$1,200-1,400Marine/RV crossover, compact

2. Central/remote systems Larger composting chambers installed in basements or outbuildings, connected to conventional-looking toilets via chutes. Suitable for multi-bathroom homes or higher-capacity needs.

Model ExamplesCapacityPower RequiredPrice RangeBest For
Sun-Mar Centrex5-7 adults120V$2,500-3,500Multi-bathroom homes
Clivus Multrum8+ adultsVaries$5,000-15,000+Large homes, commercial
Phoenix6-8 adults120V$3,000-5,000Year-round high-capacity

3. DIY bucket systems Simple, low-cost systems using 5-gallon buckets with snap-on toilet seats. Waste is collected with cover material and composted in external bins.

Cost: $20-100 for basic setup Best for: Temporary use, extreme budgets, backup systems Considerations: Requires more hands-on management; external composting bin needed

Citation: Composting toilet design principles and pathogen destruction requirements detailed in the Humanure Handbook by Joseph Jenkins (4th edition) and EPA guidelines for composting toilet systems.

Urine Diversion: The Key to Odor Control

Many modern composting toilets incorporate urine-diverting designs that separate liquid and solid waste at the source. This approach offers significant advantages:

  • Dramatically reduced odor: Urine mixing with feces creates ammonia; separation eliminates this
  • Faster composting: Solids maintain optimal moisture without urine saturation
  • Simplified management: Urine can be diluted and applied directly as nitrogen-rich fertilizer
  • Extended capacity: Solids-only chambers require less frequent emptying

Urine, when separated, is essentially sterile and can be diluted 8:1 to 10:1 with water for direct application to non-edible plants. This represents valuable nitrogen fertilizer—approximately 11 pounds of nitrogen annually per person.

[Image suggestion: Comparison diagram showing standard composting toilet vs. urine-diverting design, with labeled components and waste flow paths]

Installation Considerations

Ventilation is critical: Composting toilets require continuous airflow through the composting chamber, exhausting through a vent pipe to the exterior. Install vent pipes with:

  • Minimum 2-inch diameter (4-inch preferred for passive systems)
  • Vertical routing with minimal bends
  • Termination above roofline, away from windows
  • Optional solar-powered vent fan for enhanced airflow
Climate factors in Oklahoma:
SeasonChallengeSolution
Summer heatAccelerated decomposition, potential dryingMonitor moisture; add water if needed
Winter coldSlowed decomposition, potential freezingLocate unit in heated space; insulate external chambers
HumidityExcess moisture in chamberEnsure adequate ventilation; use fan-assisted systems
Tornado seasonVent pipe vulnerabilitySecure vent installations; maintain backup cover material supply

Location requirements:

  • Install in heated living space for year-round use (garage/outbuilding units may freeze)
  • Position for easy access to vent routing
  • Consider proximity to external composting area for finished material
  • Ensure adequate space for maintenance access

Oklahoma Regulations for Composting Toilets

Oklahoma DEQ recognizes composting toilets as approved alternative systems, but regulations vary by county and specific circumstances:

Key regulatory points:
  1. Greywater system still required: Composting toilets handle only toilet waste. Oklahoma requires an approved system (typically small septic or greywater system) for sink, shower, and laundry discharge.

  2. County health department approval: Before installing, contact your county health department to confirm composting toilets are permitted and identify any specific requirements. Most rural Oklahoma counties approve composting toilets for residential use, but some may require:

    • Specific NSF-certified models
    • Professional installation certification
    • Backup conventional system on the property
    • Periodic inspection schedules
  3. Finished compost handling: Regulations typically require that humanure compost be used only for non-edible landscaping, buried, or disposed of through approved means—not applied to food gardens.

Pro tip: When seeking county approval, present composting toilets as “NSF/ANSI 41-certified alternative waste treatment systems” rather than “composting toilets.” The technical framing often smooths regulatory conversations.

Maintenance and Long-Term Management

Composting toilet maintenance is straightforward but non-negotiable:

TaskFrequencyTime Required
Add cover materialAfter each solid use30 seconds
Empty urine container (diverting models)Every 2-4 days5 minutes
Rotate/mix compost (some models)Weekly2 minutes
Empty finished compostEvery 2-6 months30-60 minutes
Deep clean and inspectAnnually2-3 hours

Finished compost handling: Material removed from composting toilets should undergo additional curing (6-12 months in a secondary compost bin) before landscape application. This extended curing ensures complete pathogen destruction and produces safe, stable humus. Apply only to:

  • Fruit trees and orchards (not contacting edible portions)
  • Ornamental landscaping
  • Non-edible perennials and shrubs
  • Buried under mulch in non-garden areas

[Image suggestion: Timeline infographic showing composting toilet waste progression from fresh deposit through active composting, curing phase, and final landscape application]

8b. Septic Systems: Conventional Waste Treatment

Despite the advantages of composting toilets, traditional septic systems remain the most common waste management solution for rural Oklahoma properties. Septic technology is well-understood, universally accepted by regulators, and compatible with standard plumbing fixtures. For homesteaders who prefer conventional bathroom facilities or whose properties aren’t suited for composting systems, a properly designed septic system provides reliable, low-maintenance waste processing for decades.

How Septic Systems Work

Conventional septic systems process waste through a two-stage approach:

Stage 1: Septic tank Wastewater flows into a buried tank (typically 1,000-1,500 gallons for residential use) where:

  • Heavy solids settle to the bottom, forming sludge
  • Lighter materials (grease, soap) float to the top, forming scum
  • Partially clarified liquid (effluent) flows out to the drain field
  • Anaerobic bacteria slowly digest settled solids, reducing accumulation

Stage 2: Drain field (leach field) Effluent disperses through perforated pipes into gravel-filled trenches, where:

  • Soil bacteria complete biological treatment
  • Filtered water percolates into groundwater
  • Remaining pathogens are destroyed by soil microorganisms

[Image suggestion: Cutaway diagram showing complete septic system—house connection, septic tank with sludge/scum/effluent layers, distribution box, and drain field trenches with soil absorption detail]

Site Evaluation and Soil Testing

Before installing any septic system in Oklahoma, DEQ requires a site evaluation and soil analysis to determine:

  1. Soil percolation rate: How quickly water absorbs into the soil
  2. Seasonal high water table: Groundwater proximity that could contaminate or flood the system
  3. Depth to restrictive layers: Bedrock, clay, or other barriers affecting absorption
  4. Slope and drainage: Surface water patterns affecting drain field placement
  5. Setback compliance: Required distances from wells, property lines, waterways, and structures

Oklahoma soil classifications and system implications:

Soil TypePercolation RateSystem Implications
Sandy loamFast (< 15 min/inch)Standard trench system; may need larger field to prevent groundwater contamination
LoamModerate (15-30 min/inch)Ideal conditions; standard system sizing
Clay loamSlow (30-60 min/inch)Larger drain field required; may need alternative system
Heavy clayVery slow (> 60 min/inch)Conventional system likely unsuitable; alternative system required

Conducting the site evaluation:

Oklahoma requires licensed soil profilers or DEQ-certified installers to perform site evaluations. The process typically includes:

  1. Soil boring: Multiple test holes (usually 3-5) dug to 48-60 inch depth
  2. Profile analysis: Soil layers, colors, textures, and mottling documented
  3. Percolation testing: Water absorption rate measured (required in some counties)
  4. Site mapping: Proposed system location, setbacks, and topography recorded
  5. Report submission: Findings submitted to county health department for permit approval

Cost: $200-500 for site evaluation and soil profiling

Citation: Oklahoma DEQ On-Site Sewage Treatment regulations (OAC 252:641) establish site evaluation requirements and system design standards. Current regulations available at deq.ok.gov.

System Types for Oklahoma Conditions

1. Conventional gravity system The standard approach where suitable soil exists: septic tank flows to distribution box, then to gravity-fed drain field trenches.

ComponentTypical CostLifespan
Septic tank (1,000-1,500 gal concrete)$800-2,00040+ years
Distribution box$100-30040+ years
Drain field (3-bedroom home)$2,000-5,00020-30 years
Installation labor$1,500-4,000
Total system cost$4,500-11,000

Best for: Properties with adequate soil percolation, sufficient space, and favorable topography

2. Mound system When high water tables, shallow bedrock, or poor soil percolation preclude conventional drain fields, mound systems build an elevated absorption area using imported sand and gravel.

How it works:

  • Effluent pumped from septic tank to dosing chamber
  • Timed doses distributed across elevated sand mound
  • Sand layer provides treatment; soil below provides final polishing
  • Mound constructed 2-4 feet above natural grade

Cost: $10,000-25,000 (significantly higher than conventional) Best for: High water table areas, clay-heavy soils, shallow bedrock sites

[Image suggestion: Cross-sectional comparison of conventional trench system vs. mound system, showing elevation differences and component layers]

3. Aerobic treatment unit (ATU) Mechanical systems that introduce oxygen to accelerate waste decomposition, producing higher-quality effluent suitable for surface application or smaller drain fields.

Components:

  • Trash tank (primary settling)
  • Aerobic chamber (aerated treatment)
  • Clarifier (final settling)
  • Disinfection (chlorine or UV)
  • Surface or subsurface dispersal

Advantages:

  • Smaller footprint than conventional systems
  • Better treatment for challenging sites
  • Can enable surface spray dispersal (reduces drain field size)
  • Suitable for poor soil conditions

Disadvantages:

  • Higher installation cost ($8,000-20,000)
  • Ongoing electricity cost for aeration
  • Required maintenance contract (Oklahoma DEQ mandate)
  • More mechanical components to fail

Best for: Small lots, poor soil, sites requiring maximum treatment

4. Low-pressure pipe (LPP) system Effluent is pumped through small-diameter pipes with drilled holes, providing even distribution across the entire drain field simultaneously.

Cost: $6,000-15,000 Best for: Sloping sites, irregular lot shapes, areas requiring precise distribution

Oklahoma Permit Requirements

Septic system installation in Oklahoma requires permits from the county health department (or DEQ in some jurisdictions). The process typically involves:

Step 1: Site evaluation Licensed professional conducts soil analysis and site assessment (see above).

Step 2: System design Based on site evaluation, bedrooms/occupancy, and daily flow estimates, designer specifies:

  • Tank size and type
  • Drain field dimensions and configuration
  • System type (conventional, mound, ATU, etc.)
  • Component specifications

Step 3: Permit application Submit to county health department with:

  • Completed application form
  • Site evaluation report
  • System design drawings
  • Property survey or plat
  • Application fee ($100-400 depending on county)

Step 4: Installation inspection County inspector verifies installation matches approved design before burial. Critical: Never backfill before inspection approval—you’ll be required to excavate for verification.

Step 5: Final approval Operating permit issued; system registered with county records.

Setback Requirements

Oklahoma mandates minimum distances between septic components and other features:

FeatureSeptic Tank SetbackDrain Field Setback
Private water well50 feet100 feet
Public water well100 feet200 feet
Property lines10 feet10 feet
Structures (foundation)10 feet20 feet
Surface water (streams, ponds)50 feet100 feet
Driveways/parking10 feet10 feet

Pro tip: Map all setbacks before purchasing property. Small or irregularly shaped lots may have insufficient area for required setbacks—a deal-breaking discovery after closing.

Septic System Maintenance

Proper maintenance extends system life and prevents costly failures:

TaskFrequencyCostWhy It Matters
Tank pumpingEvery 3-5 years$250-500Prevents solids from reaching drain field
Tank inspectionWith each pumpingIncludedIdentifies cracks, baffle damage, structural issues
Effluent filter cleaningAnnuallyDIY or $50-100Prevents drain field clogging
Drain field inspectionEvery 5 years$100-200Early detection of saturation or failure
ATU service (if applicable)Per contract (typically quarterly)$150-400/yearRequired by Oklahoma DEQ; maintains treatment quality

Warning signs of septic problems:

  • Slow drains throughout the house
  • Sewage odors indoors or near drain field
  • Standing water or soggy areas over drain field
  • Unusually green or lush grass over drain field (indicates surfacing effluent)
  • Sewage backup into lowest drains

Off-Grid Septic Considerations

Standard septic systems require no electricity—gravity moves waste from home to tank to drain field. However, some system types require power:

System TypePower RequirementOff-Grid Solution
Conventional gravityNoneIdeal for off-grid
Mound systemEffluent pump (intermittent)Small inverter load; battery-compatible
ATUContinuous aeration + pumpsSignificant load (200-500W); requires robust power system
LPP systemDistribution pump (intermittent)Small inverter load; battery-compatible

For off-grid installations, conventional gravity systems minimize electrical dependency. If site conditions require pumped systems, install high-water alarms and backup float switches to prevent overflow during power outages. Size holding capacity for 2-3 days of household flow to buffer extended outages.

[Image suggestion: Decision flowchart for selecting appropriate septic system type based on soil conditions, lot size, slope, and water table depth]

8c. Integrated Waste Strategy: Combining Approaches

The most resilient off-grid homesteads often combine multiple waste management strategies, matching each waste stream to the most appropriate processing method:

Recommended integrated approach:

Waste StreamRecommended SystemRationale
Toilet waste (blackwater)Composting toiletEliminates largest water demand; produces useful compost
Kitchen sinkSmall septic or constructed wetlandFood waste requires biological treatment
Bathroom sinks, showersGreywater to landscapeRelatively clean water; valuable for irrigation
LaundryGreywater to orchard/treesHigh volume; excellent for deep-rooted plants

This integrated approach dramatically reduces septic system size (and cost), minimizes water consumption, and converts waste streams into resources—embodying the closed-loop philosophy central to sustainable homesteading.

System sizing benefits:

A household using composting toilets and greywater recycling might reduce septic system requirements by 60-70%, potentially enabling:

  • Smaller septic tank (500-750 gallons vs. 1,000+)
  • Reduced drain field size
  • Viability on sites otherwise unsuitable for full septic systems
  • Lower installation and long-term maintenance costs

Pro tip: When pursuing integrated systems, engage your county health department early in planning. Present a comprehensive waste management plan showing how each stream is handled. Regulators often appreciate thoughtful, compliant approaches—even if unconventional.


9. Building Your Homestead

Design and Construction Tips

a. Passive Solar Design

Passive solar design is a sustainable way to heat and cool your off-grid home. By positioning your home to capture sunlight in the winter and minimize exposure during the summer, you can significantly reduce your energy needs. In Oklahoma, a southern-facing home with proper insulation will maximize energy efficiency year-round.

b. Choosing the Right Building Materials

Consider sustainable building materials such as straw bales, reclaimed wood, or cob, which have lower environmental impacts than conventional materials. Additionally, materials like metal roofs can be beneficial in areas prone to wildfires or harsh weather conditions.

c. DIY vs. Professional Builders

While DIY construction can save money, hiring professionals for key aspects like plumbing, electrical, and structural work ensures that your homestead is built to last and meets all legal requirements. Many homesteaders find a hybrid approach—doing some work themselves while outsourcing more complex tasks—to be the most cost-effective option.

7. Benefits of Purchasing Through LandFix.com

At LandFix.com, we understand the unique needs of off-grid homesteaders. Our listings include rural properties that offer the perfect balance of accessibility and seclusion, with many parcels featuring access to natural resources like water and forests. We also provide comprehensive property details, making it easy for buyers to evaluate land for off-grid living.

We go beyond just offering land—we’re committed to helping you through every step of the journey

Your Header Title